Important Safety Note: Always wear appropriate eye and face coverings when demolishing tile.
How to Replace Cracked Tile
Step 1: Tape Tile Edges
Apply blue tape to the edges of surrounding tiles. This will help protect the surrounding intact tiles from chipping while you remove the cracked tile.
Step 2: Remove Grout
Using a utility knife, scrape out all the grout around the tile you are replacing.
Go slowly, keeping the knife along the edge of the tile. Avoid twisting the utility knife. Twisting can scrape along the edge of the tile and cause more chipping. Once you're done cleaning out your joint, vacuum the area.
Step 3: Remove the Cracked Tile
Start hitting the center of the tile with the prongs of your hammer. This will break the bond from the thinset mortar and allow you to start prying up pieces from the interior surface of the tile.
Always start prying from the center of the tile. Prying from the outside edge can cause you to accidentally crack one of the adjacent tiles.
Every tile removal will be different based on how the tile was installed. Sometimes tile will come up in big chunks, but tiles that were installed with proper installation methods are typically very hard to remove. Go slowly!
Step 4: Remove Thin Set
If you encounter any patches of thinset that are especially difficult to get up, you can tap your chisel with your hammer. Start with light taps and gradually increase force if needed, being careful not to let the chisel head slip and hit your other tile.
To make sure you didn't miss any thinset spots, place your tile down dry (without thinset). If it lays perfectly flat, you're good to go!
Step 5: Replace With New Tile
When the area is ready to accept new tile, add your thinset and your replacement tile. Let it dry overnight, then remove any tape and tile spacers, clean out your grout joint, and regrout the area. If you are new to grouting, make sure to check out our guide on the top tips on how to grout like a pro.
Tips for Removing Thinset
If you encounter any patches of thinset that are especially difficult to get up, you can tap your chisel with your hammer. Start with light taps and gradually increase force if needed, being careful not to let the chisel head slip and hit your other tile.
To make sure you didn't miss any thinset spots, place your tile down dry (without thinset). If it lays perfectly flat, you're good to go!
How to Fix Cracked Tile
Next, we’ll go over how to repair chipped tile using two-part epoxy. Tile chips can happen from either a large heavy item falling on the tile or while being installed and cleaning out the grout joint. Not every crack or chip will be so bad that you need to replace the tile altogether, and that’s where this second method comes in.
What You'll Need
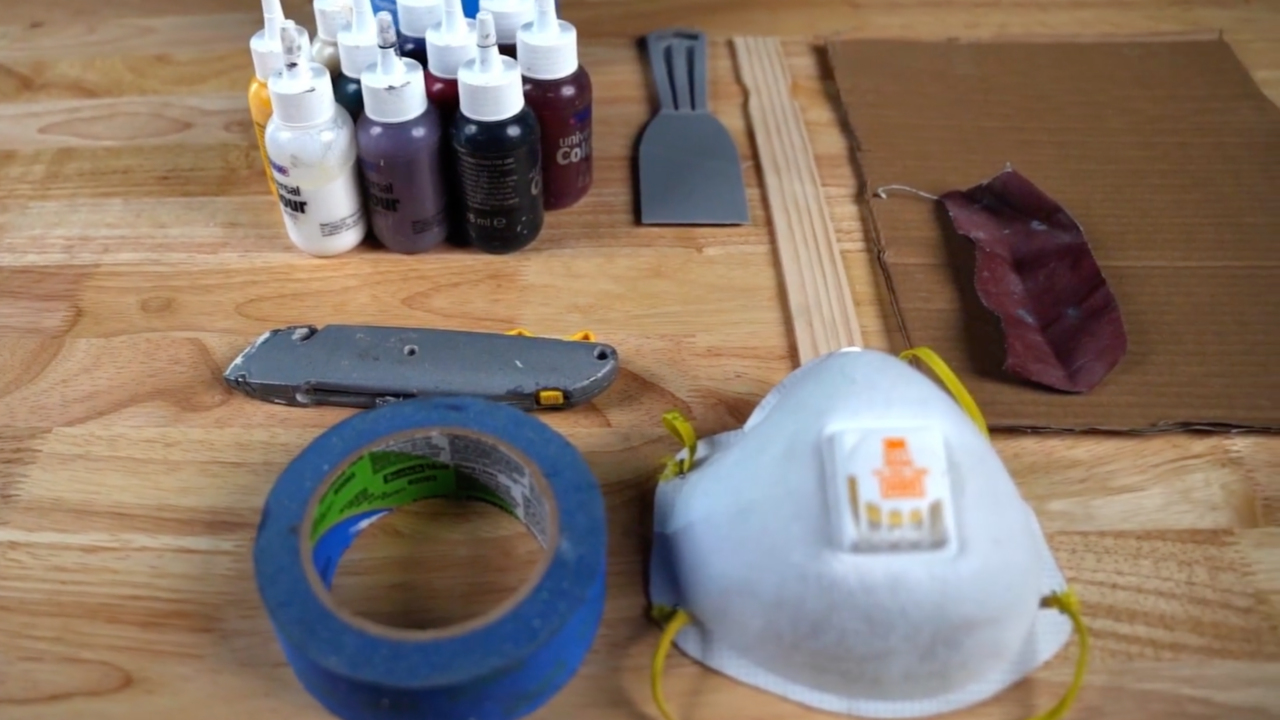
Start by gathering the following tools and equipment:
- Painter's tape
- Two-part epoxy and a color kit (available at a local hardware store or online)
- Utility knife
- Piece of cardboard
- 220-grit sandpaper
- Wooden stick for mixing epoxy
- Plastic applicator
Important Safety Note: When working with epoxy, always use appropriate face and eye coverings and work in a well-ventilated area.
Step 1: Tape It Off
Use painter's tape to tape off the chipped area. Leave some of the surrounding tile showing so you can blend the repaired chip.
Step 2: Mix Your Color
Start adding color to a small amount of epoxy, getting as close to the color of the original tile as possible.
Go slowly, keeping the knife along the edge of the tile. Avoid twisting the utility knife. Twisting can scrape along the edge of the tile and cause more chipping. Once you're done cleaning out your joint, vacuum the area.
Step 3: Add Hardener and Apply Epoxy
Next, divide your color mixture in two, and add hardener to one half only. This way, you have extra epoxy in the correct shade, in case you need to mix more later. Using a plastic applicator, apply a small amount of epoxy to fill the chip, quickly scraping away any excess.
Step 4: Square Tile Edge
Try to get the repaired area as flat and flush with the rest of the tile as possible, using a razorblade to square off the edge if necessary.
Step 5: Remove Tape
While the mixture is still wet, remove your blue tape. Once you're happy with the look of your epoxy repair, the next step is to let it dry according to package directions.
Step 6: Sand and Blend
Finally, blend the repaired chip with the rest of the tile. Use a small piece of sandpaper to lightly buff the area and flatten any raised or uneven surfaces.
Pro Tips for Sanding and Blending
- Less is more. Use a light touch and go slowly, sanding a little bit at a time. If you take too much material off, you may have to start the process all over again.
- You'll know when you're done sanding when the repaired area is smooth and flush with the rest of the tile. Run your finger across it, you shouldn't feel anything.

